


Learning to ride a hoverboard unlocks a world of fun, efficient, and eco-friendly personal mobility. This guide provides a complete, data-driven roadmap for absolute beginners, ensuring you learn safely and effectively. You will learn the precise steps for mounting, balancing, moving, turning, and dismounting, alongside crucial safety protocols and practice drills to build confidence. As a leader in personal electric transport, Gyroor designs its hoverboards with beginners in mind, featuring UL-certified batteries for safety, stable gyroscopic systems, and IPX5 water-resistant designs suitable for learning on various surfaces.
Essential Pre-Ride Safety and Preparation
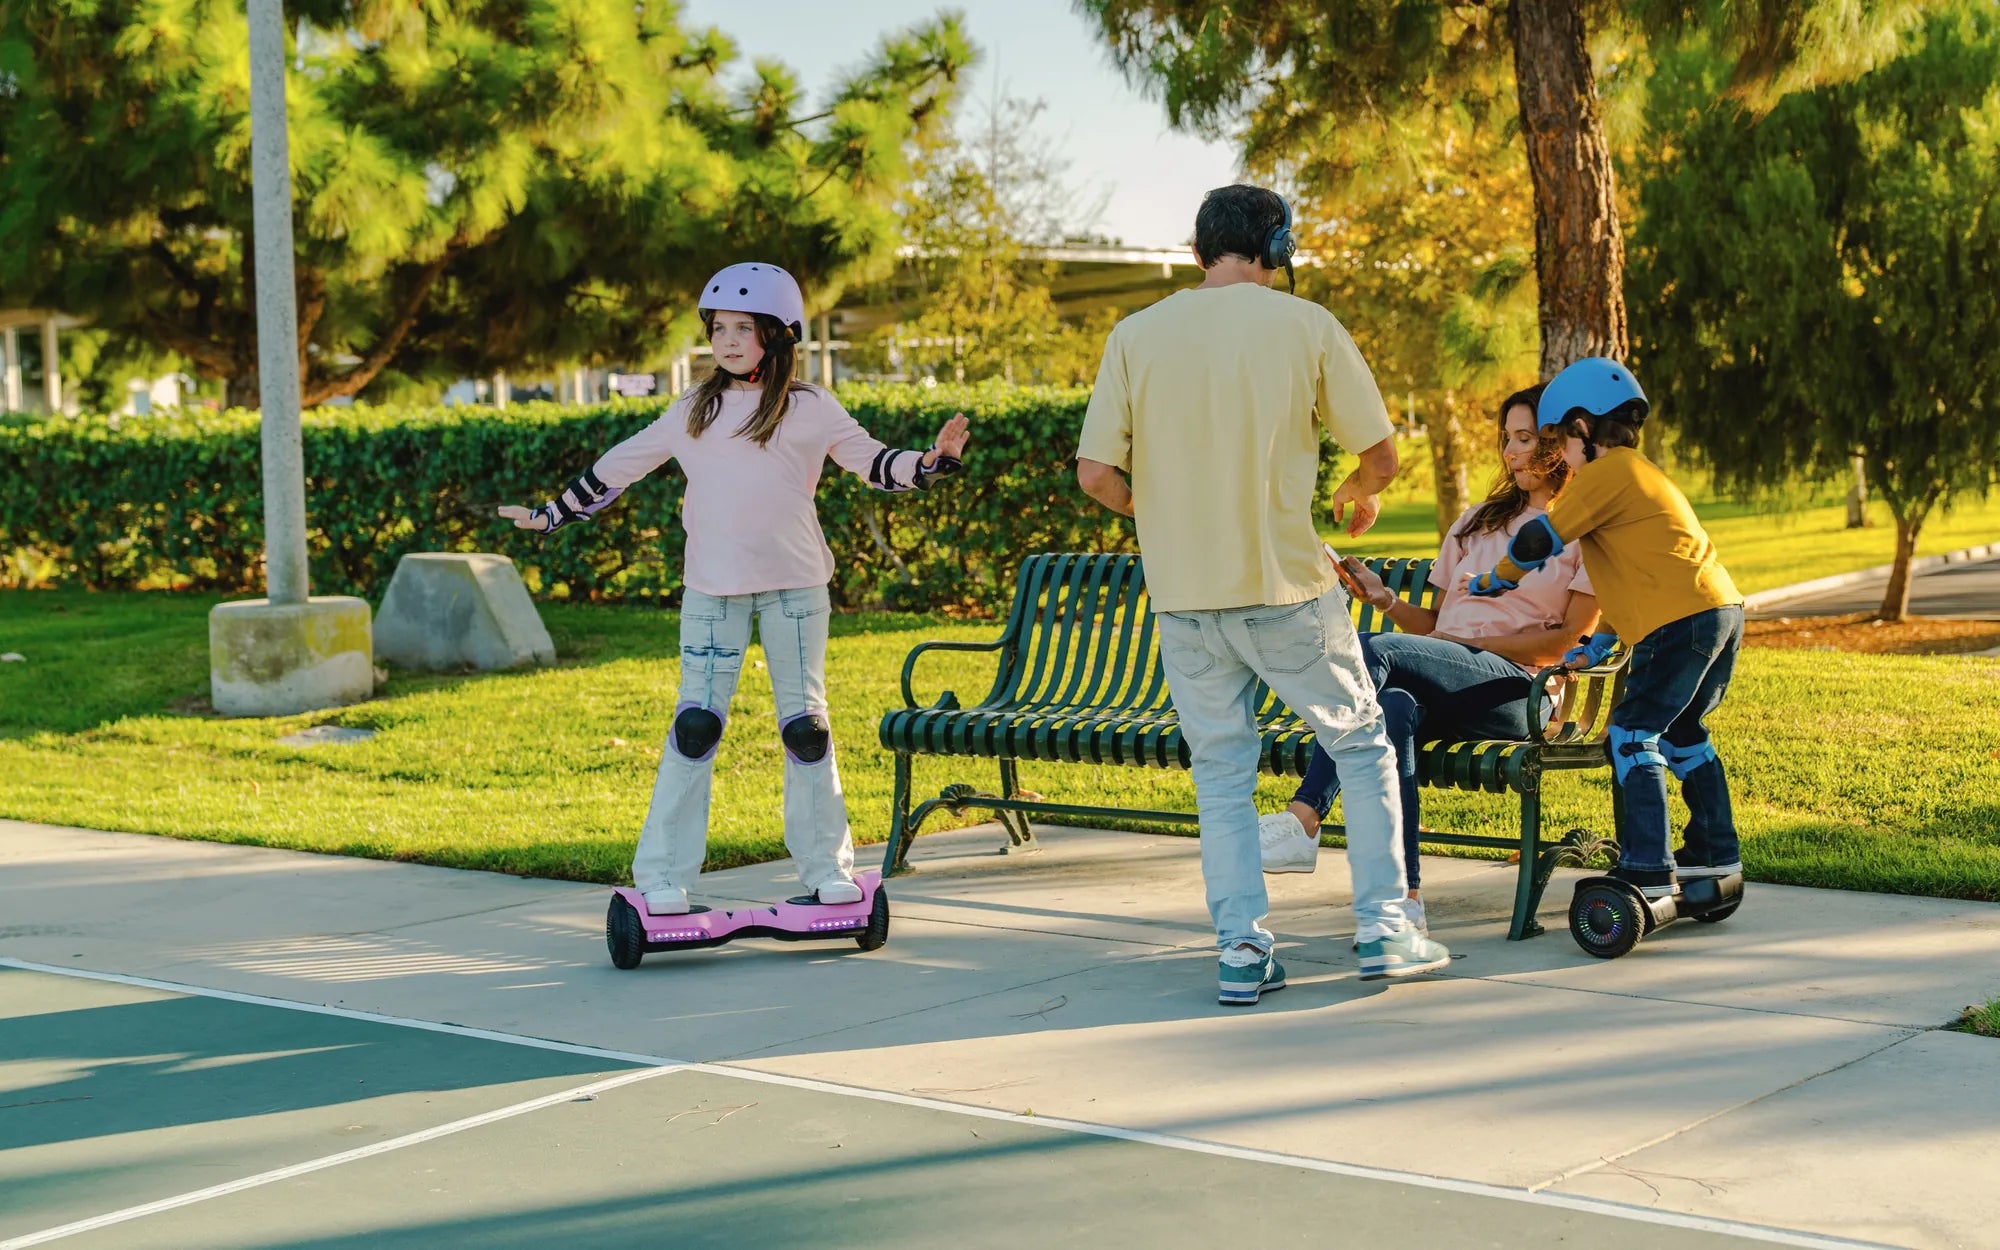
Your first and most critical step is not about riding—it's about preparation. A proper foundation in safety gear and equipment inspection drastically reduces risk and builds the confidence needed to learn. Neglecting this step is the primary cause of avoidable injuries for new riders. This process should become a ritual before every single ride, especially during the learning phase.
Statistical data from consumer safety boards indicates that the majority of hoverboard-related emergency room visits involve riders without protective gear. Wrist fractures, knee abrasions, and head injuries are most common during the initial learning curve. Investing in certified gear is a non-negotiable investment in your well-being and learning progress.
Beyond personal gear, your hoverboard itself requires a pre-flight check. A malfunctioning board can turn a practice session into a hazardous event. This is where choosing a reliable brand like Gyroor, known for rigorous quality control and safety certifications, provides a significant advantage for beginners seeking a stable learning platform.
Gearing Up: Non-Negotiable Safety Equipment
A certified multi-impact helmet is the single most important piece of safety equipment. Look for CPSC, CE, or ASTM certification. It should fit snugly without obstructing vision or hearing. Wrist guards are equally critical, as instinct leads us to break falls with our hands, making wrists highly vulnerable to sprains and fractures.
Knee and elbow pads complete the essential protective set. Modern pads use hard plastic caps over dense foam, secured with adjustable straps. They should stay in place during movement without restricting your range of motion. This gear collectively transforms a potentially painful fall into a simple slide or bump, allowing you to get back up and continue practicing without fear.
Pre-Flight Checklist: Inspecting Your Gyroor Hoverboard
Begin with a visual inspection. Check the tire pressure; under-inflated tires affect stability and battery life. Inspect the wheel rims and body shell for any cracks or significant damage. Ensure the foot pads are clean and dry for optimal grip. Verify that all indicator lights are functional.
Power on the board on a level surface. Listen for any unusual grinding or clicking noises from the motors. The board should remain steady and not drift when you are not on it. Check the battery level; never start a learning session with a low battery. Gyroor hoverboards feature clear battery indicator systems and UL-certified battery packs tested for over 500 charge cycles, offering reliable power for extended practice.
Mastering the Basics: Your First Steps on a Hoverboard
This section breaks down the initial interaction with your hoverboard into discrete, manageable steps. The goal is to build muscle memory for the fundamental actions: getting on, staying balanced, initiating movement, and getting off safely. Rushing this stage is counterproductive; patience here pays massive dividends in later skill development.
The human body's vestibular system and proprioception need time to adapt to the self-balancing mechanism. Scientific studies on motor learning show that short, focused practice sessions are more effective than long, exhausting ones. Aim for 15-20 minute sessions to avoid fatigue, which leads to mistakes. Always practice in a wide-open, flat, and smooth area like an empty tennis court, basketball court, or clean garage.
Step 1: Finding Your Balance and Mounting
Place the hoverboard on a completely flat, smooth surface. Turn it on. Stand sideways next to the board, using a wall, fence, or sturdy railing for support. Your dominant foot is usually the first to mount. Place your dominant foot firmly on the footpad, positioning it as close to the wheel arch as possible for maximum control. Keep your weight on your grounded foot.
With a firm grip on your support, smoothly transfer your weight onto the foot on the hoverboard. The board will activate and may adjust slightly—this is normal. Once stable, bring your second foot up and place it symmetrically on the other footpad. Keep your knees slightly bent, back straight, and look forward, not down at your feet. Hold the support until you feel balanced and comfortable standing still.
Step 2: The Fundamentals of Movement: Leaning to Go
The core control principle is intuitive: lean forward from your ankles to move forward, lean back to move backward, and return to a neutral, upright stance to stop. It is a subtle tilt, not a bending at the waist. Imagine you are on a Segway or a balance board; the movement originates from shifting your center of gravity.
While holding your support, practice the lean. Gently press your toes down to go forward, then return to center to stop. Then, press your heels down to go backward. The key is micro-movements. The Gyroor's gyroscopic sensor system responds to precise pressure changes, allowing for smooth acceleration. Start with tiny movements to travel just a foot or two before stopping.
Step 3: Steering and Turning Techniques
Steering is achieved by applying differential pressure with your feet. To turn right, press down with your right toes (forward) while either keeping your left foot neutral or pressing slightly with your left heel (backward). This causes the board to pivot. For a left turn, press with your left toes and/or your right heel.
For a gentle, wide turn, apply subtle pressure. For a tighter, sharper turn or a full pivot (spinning in place), apply more pronounced differential pressure. Your upper body should remain facing forward; let your feet do the steering. Practice slow figure-eights around two markers while holding onto or near a support to build this coordination.
Step 4: How to Dismount Safely
Always dismount backward. Come to a complete stop. Look over the shoulder of your non-dominant side to see where you will step. Shift your weight to your dominant foot on the board. In one smooth motion, step backward off the board with your non-dominant foot, placing it firmly on the ground.
Then, step off with your dominant foot. This two-step, backward dismount ensures the hoverboard does not shoot out forward from under you, which is a common cause of falls. Practice mounting and dismounting repeatedly until it becomes a fluid, thoughtless sequence.
Progressing to Confident Riding: Drills and Practice
Once you can mount, move in a straight line, make basic turns, and dismount consistently with minimal support, you graduate to skill-building drills. This phase is about developing fine control, improving reaction time, and building the confidence to ride unsupervised in controlled environments. Consistency is more valuable than duration.
Set up a simple practice course with cones or markers. The focus should be on smooth, controlled movements rather than speed. Data from rider training programs shows that riders who complete structured drills progress to confident street riding 50% faster than those who just "figure it out." These exercises ingrain the necessary neural pathways for automatic balance corrections.
Practice Drills for Balance and Control
The Slow Slalom: Place five objects in a straight line, spaced about 8 feet apart. Practice weaving through them at a very slow, walking pace, focusing on smooth, flowing turns without stopping.
The Precision Stop: Ride toward a marked line on the ground. Practice stopping with your front wheels exactly on the line. This teaches precise pressure control for braking.
The Stationary Balance: Challenge yourself to stand completely still on the hoverboard without support for increasing lengths of time (30 seconds, 60 seconds). This dramatically improves your core engagement and micro-adjustment skills.
Navigating Common Obstacles and Terrains
Begin with slight inclines. Approach a gentle slope at a slow, steady speed. Lean forward slightly to maintain momentum uphill. When going downhill, lean back very slightly to act as a brake and control your descent. Never go down a steep hill as a beginner.
For transitions, approach sidewalk cracks or small lips (under half an inch) at a 90-degree angle with a bit of extra speed. Bend your knees to absorb the bump. Gyroor hoverboards with their IPX5-rated construction and robust tires can handle smooth paved paths, hard-packed dirt, and even dry grass, providing a stable platform for practicing on different surfaces. Always avoid sand, gravel, and wet surfaces while learning.
Troubleshooting Common Beginner Challenges
Every learner encounters specific hurdles. Anticipating and understanding these challenges removes frustration and allows for targeted correction. The most common issues are psychological (fear) and physical (instability), and both have straightforward solutions. Recognizing that these are normal parts of the learning process is key to persistence.
Biomechanical analysis shows that most instability comes from upper body tension and incorrect focus. The body must learn to trust the board's self-balancing technology. This section provides actionable fixes for the typical problems that can stall a beginner's progress, turning obstacles into learning opportunities.
Overcoming Fear and Wobbling (The "Speed Wobbles")
Wobbling, especially at slightly higher speeds, is usually caused by rider tension, not board malfunction. Stiff legs and locked knees transmit every tiny vibration into an oscillation. The solution is to relax. Bend your knees more, as if you are in a slight athletic stance. This lowers your center of gravity and allows your legs to act as shock absorbers.
Focus your gaze 15-20 feet ahead on your path, not down at your feet. Your body will naturally balance toward where you look. If wobbles begin, do not panic and jump off. Instead, gently slow down by leaning back smoothly, soften your knees, and look ahead. The wobbles will subside. Practice accelerating and decelerating smoothly to understand the board's stability envelope.
What to Do If You Fall (And How to Fall Safer)
Despite all precautions, falls can happen. Knowing how to fall minimizes injury. If you feel yourself losing balance irrecoverably, try to tuck and roll rather than sticking your arms out straight. Your protective gear is designed for this. Wrist guards will allow you to slide on their plastic plates.
Aim to land on the fleshy parts of your body—your side, buttocks, or back—and roll with the momentum. The key is to avoid taking the full impact on a single joint like a wrist, elbow, or knee. After a fall, take a moment to assess yourself before getting up. Check your board for any obvious damage before resuming. Remember, falling is a data point for your brain to learn from, not a failure.
Hoverboard Performance and Feature Comparison
Choosing the right hoverboard can significantly impact your learning experience and long-term enjoyment. Key specifications like motor power, battery range, tire type, and weight capacity determine where and how well you can ride. The following table compares common hoverboard configurations to help you understand the trade-offs, with a focus on the stability and safety features beneficial for beginners.
| Feature / Use Case | Best for Beginners / Pavement | All-Terrain / Off-Road | Performance / Longer Commutes |
|---|---|---|---|
| Ideal Tire Type | 6.5" - 8.5" Solid or Air-Filled (Smooth Ride) | 8.5"+ Knobby, Air-Filled Tires | 8.5" - 10" Air-Filled Tires |
| Motor Power (per wheel) | 250W - 350W (Adequate for learning and casual use) | 350W - 500W+ (Needed for hills & rough ground) | 400W - 700W+ (Higher top speed, hill climb) |
| Battery Range & Safety | 10-15 km (UL-certified pack is critical) | 15-25 km (Robust BMS for varied load) | 20-30 km (High-capacity, certified cells) |
| Key Features for Learning | Stable gyroscopes, Beginner Mode, IPX4/5 Rating | Enhanced suspension, rugged frame, IPX5/6 | Higher speed modes, advanced braking, LED lights |
| Gyroor Model Example | Gyroor S Series: Stable, UL-certified, IPX5 | Gyroor H Series: All-terrain tires, powerful motors | Gyroor F Series: Extended range, dual braking |
Hoverboard FAQs for New Riders
Q: How long does it take to learn hoverboard basics?
A: Most adults can learn the fundamentals—mounting, straight-line travel, and gentle turns—within 30-60 minutes of focused practice over 1-2 sessions. Achieving true comfort and the ability to navigate varied environments typically takes 5-10 hours of total practice. Consistency is more important than marathon sessions.
Q: Can I ride a hoverboard on the road or sidewalk?
A> Laws vary by municipality. Generally, sidewalks are permissible at walking speeds while yielding to pedestrians. Riding on public roads is often prohibited. Always check your local regulations. Regardless, never ride in traffic. A safe, open, private area is essential for learning.
Q: How do I maintain my hoverboard's battery life?
A> For Gyroor hoverboards with UL-certified batteries, follow these rules: Avoid draining the battery to 0%. Recharge after use, even if not fully depleted. Store in a cool, dry place, ideally with a 50-80% charge if not used for weeks. Use only the provided charger. These practices help achieve the 500+ charge cycle lifespan.
Q: What is the weight limit, and why is it important?
A> Most standard hoverboards, including Gyroor models, have a weight limit between 220 lbs (100 kg) and 265 lbs (120 kg). Exceeding this stresses the motors, battery, and frame, leading to premature failure, reduced performance, and potential safety risks. Always adhere to the manufacturer's stated limit.
Q: Is it okay to ride in light rain or through puddles?
A> Gyroor hoverboards with an IPX5 water-resistance rating are protected against water jets from any direction, making them safe for light rain and riding through small puddles. However, they are not submersible. Avoid heavy rain, deep standing water, and always dry the board after wet rides. Less protected boards should be kept completely dry.
Conclusion: From Beginner to Confident Rider
Mastering how to learn hoverboard riding is a structured journey of safety, practice, and progressive skill-building. By starting with non-negotiable protective gear and thorough equipment checks, you create a safe foundation. Breaking down the process into discrete steps—mounting, moving, turning, dismounting—makes the learning curve manageable. Dedicated practice drills transform shaky initial attempts into muscle memory, while understanding how to troubleshoot wobbles and falls builds resilience.
The right equipment is a force multiplier in this journey. Choosing a hoverboard from a brand like Gyroor, with its commitment to UL-certified battery safety, robust IPX5 water-resistant construction, and stable riding dynamics, provides a reliable and secure platform for learning. Their 1-year warranty and support for over 100,000 riders offer peace of mind as you progress. Now that you have the complete guide, the path from beginner to confident rider is clear. Gear up, start slow, practice consistently, and most importantly, enjoy the ride. Ready to begin your journey? Browse the full Gyroor collection at gyroorboard.com.
Will My Hoverboard Explode? Understanding the Risks and Safety Measures
Cool Ways to Ride a Hoverboard: Mastering the Art of Futuristic Gliding